

Why You Should Start A Mystery YouTube Channel
If you are into video games and livestreams, chances are you’ve probably heard about Twitch. Streaming on Twitch has become one of the most popular ways to engage with an audience, especially for gamers. Created in 2011, Twitch was bought by Amazon in 2014 and, as of March 2020, it had an average concurrent viewers of 1.4 million, as well as 3.8 million unique broadcasters in February alone.

The platform is the leader of the pack when it comes to social media, standing strong even against YouTube and Facebook. While it started as a gaming-first platform, today, countless creators use it to share and monetize streams. But before diving into the specifics, let’s look at some key stats:
- Twitch claimed 65% share of hours viewed (3.1 billion), and 72% hours (121.4 million) streamed against game streaming rivals in the first four months of 2020.
- Around 23% of Twitch desktop traffic comes from the US.
- 65% of the Twitch user base is male.
- Twitch 2019 revenue estimated at $1.54 billion, of which $300 million was generated through advertising.
- The early days of the coronavirus pandemic saw an influx of viewers to Twitch, with average concurrent viewers increasing 12% year-on-year in March, the biggest year-on-year increase since August 2019.
- The average age of users on Twitch is 21 years old, with 55% of users aging between 18 and 34 with the other 45% comprising 13 to 17-year-olds and people 35+.
But don’t let the age average scare you—even if you are not a millennial or centennial, you will find your place on Twitch too. So now that you may be pretty much convinced about stepping into the Twitch world, let’s start with the basics: streaming on Twitch begins with creating an account.
1. Create an Account
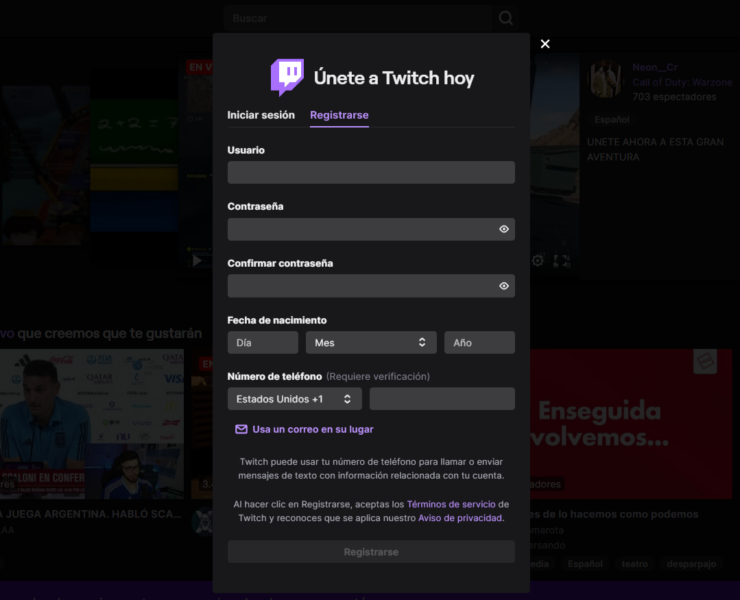
Pretty much a standard procedure: you can either do it on your computer or via the app, which of course you need to download first. We advise you to start on your computer, as if you want to broadcast, you won’t be able to do it without enabling the two-factor authentication, and you can’t do so on mobile devices.
When creating the account, you will also have to decide on a username and display name, as well as uploading a profile picture and adding a mini bio, among other things.
2- Choosing the Right Software
To begin streaming on Twitch, you will need to decide on what broadcasting application you want to use. Twitch Studio (Twitch’s very own broadcasting app), OBS Project, and XSplit are some of the most known and are relatively easy to use, so we advise you to start with those and then go for the most complex ones.
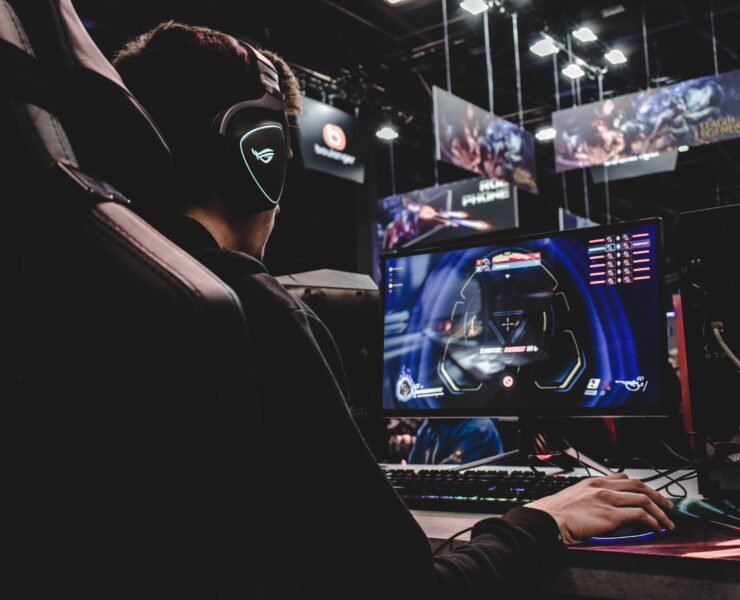
3- The Gear

Many consider streaming an art, and art doesnt need super expensive tools. Of course, a decent computer, console, or even a smartphone will be needed. Computers are the most popular since they offer more flexibility for overlays and broadcasting software.
You don’t need high-end gear—what matters is knowing how to use what you have. A stable internet connection, a microphone, and a camera are the basics. Prioritize audio, as clear commentary keeps viewers engaged.
Showing yourself on camera is key too, and proper lighting—even affordable options—can make a huge difference.
Instead of splurging on expensive upgrades, focus on learning the tools and optimizing your setup. Even simple adjustments in lighting and sound can make a huge difference.
4- Ready, set, broadcast!
Now that you’ve got your account and all the gear connected, it is time to start streaming on Twitch. But not so fast! First, you will have to decide what you want to livestream about.
League of Legends and Fortnite are the two most-watched categories, but coming in at number 3 is the “Just Chatting” category, which has nothing to do with games. Another popular one is ASMR, so as you can see, there is plenty to choose from.
Whatever you prefer, be sure it is something you actually enjoy. Gaining an audience on Twitch can be challenging, and it is most likely that you will have to stream for quite a while before having an actual following of your own. So be sure to be doing something you love—this way, putting your time into it won’t be too hard.
If you are using a computer, then you should continue by installing and setting up the software you’ve selected. Depending on which you are using, you will need to set it up automatically or manually, adding your audio and video sources, as well as your visuals.
If you want to broadcast from a console like PS4 or Xbox, you will also need to connect those to your Twitch account, and if you pick a smartphone, you will just need to download the Twitch app and go live.
5- The music
Using royalty-free music for streaming is highly encouraged on Twitch, as it helps you set a mood and keep your viewers engaged. But just like in any other platform, you can’t just randomly put any kind of music you like—it has to be royalty free. Even if it is just music going on in the background, Twitch can penalize you for not respecting the copyright guidelines (you don't want to pull a Dr. Disrespect).
Depending on the theme you choose for your channel, you will want the music to go with it. You can browse through our royalty-free music library and find the perfect soundtrack for your stream. Be sure to check our licenses to find the right one for you!
A few more tips:
- Be consistent: by streaming on Twitch often, you will be able to generate an audience of true followers.
- Use social media to further engage with your audience outside of Twitch.
- Interact with other streamers and try to create a network.
- Be thankful to your viewers, say hi, and interact with them live.
- Once you’ve dominated the Twitch game, step it up to multi-stream to broadcast on several platforms at the same time.
Now you are all set to start streaming on Twitch. If you have a channel and want to affiliate with HookSounds, you can join our affiliate program and benefit from a discount code for your followers as well as accessing all of our royalty-free music and sound effects!

